Our award-winning SLENTITE® is the original robust aerogel panel based on polyurethane. SLENTITE® is an especially attractive aerogel product.
Learn more about SLENTITE® here.
aerogel-it acquired the SLENTITE® technology from BASF at the beginning of 2022.
Identification
SLENTITE® has the following characteristics:
Panel size ~55 cm × ~36 cm, thickness 13-15 mm
Rectangular format
Neutral odor
Ivory to light yellow color
Handling
SLENTITE® is a light-weight and heavy-duty high-performance insulation panel. Despite its strong mechanical properties, the panels are brittle and should be handled with care. In particular, a damage of the edges should be prevented:
Do not throw or drop the panels
Use both hands to pick up panels, completely grasping at two edges
Do not hit panels on edges, bend or compress
Cut the panels on even ground
Storage and application conditions
For best protection, the panels should be stored in the cardboard box used for shipping until installation.
Avoid strong mechanical stress and extreme climatic conditions
Store the material in dry conditions and on even ground
Avoid temperatures over 130°C (265°F)
Protect panels from direct solar irradiation, rain, and extreme weather conditions
Conditions for application of the insulation panels depend on the chosen adhesive system. E.g. for cementitious adhesives the temperature of substrate surface and air should be at least +5°C (40°F).
Compatibility with building materials
SLENTITE® is compatible with most kinds of building materials.
The solid surface with its fine porosity is an easy substrate for liquids, pastes and viscous materials, as well as for tapes and foams of various types.
Disposal of wastes
Clean material is to be disposed of as polymeric waste.
Contaminated material must be disposed of according to local regulations.
Completely empty packaging material can be recycled.
Mechanical Processing – Cutting
For cutting, SLENTITE® insulation panels are placed on a solid, even surface.
Typically, a cutter knife is used for cutting.
The panels are scratched with the blade of the cutter knove along a ruler and then broken over the edge.
If required, the edges can be smoothed using a planer tool or rough sand paper.
Mechanical Processing – Sawing
SLENTITE® insulation panels can be saw-processed with regular saw machinery and standard wood blades.
In particular, the following equipment has proven convenient:
Circular saw for straight cuts
Band saw for bended cuts
Hole saw for circular cutouts
Jig saw cuts can show uncontrolled breaking and are therefore not recommended.
General remarks for interior insulation
SLENTITE® is well suited for interior insulation due to its vapor diffusion characteristics. Nevertheless, for all interior insulation systems, it is important to select a suitable combination of materials for adhesive, reinforcement and finishing layers to maintain vapor management capabilities throughout the system.
Therefore it is highly recommended to consult a building physics expert before installing any interior insulation system.
The installation of SLENTITE® is easy and carried out following standard building procedures. Due to the slim panel geometry, good adhesion to mortar adhesive and strong tensile strength of SLENTITE®, mechanical fixing by dowels is usually not required.
Surface Preparation
Surfaces must be clean, dry, free of dust and oil, structurally sound and capable of load-bearing. Particular attention should be paid to smoothness of the substrate surface. If required, the mortar adhesive layer can be used to level out irregularities. Curved surfaces can be lined with insulation panels cut to corresponding stripes.
Adhesive
SLENTITE® can be installed with cementitious mortars as well as urethane-based adhesives. Adhesives containing organic solvents are not suitable for the application of SLENTITE® and any contact must be avoided.
One tested option that has proved to be reliable is installing SLENTITE® with commercial cementitious adhesive and reinforcement mortars. The mortar is applied with a notched trowel on the substrate, levelling the surface as required. The SLENTITE® insulation panels are placed on the wall and positioned, pressing them carefully. Cross joints should be avoided, and joints should be kept free of mortar to prevent thermal bridges.
Reinforcement and Finish
After placing the desired layer of SLENTITE® insulation panels, cementitious mortar with embedded reinforcing mesh is applied as base coat layer. A surface finish is then applied and shaped at will, in accordance with system and design requirements.
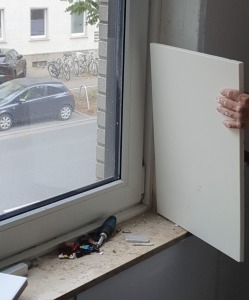
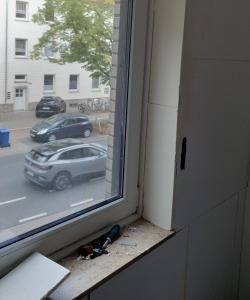
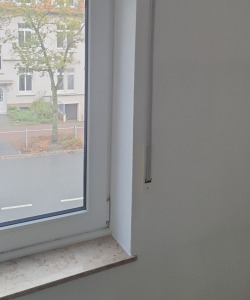
Application example: Window reveal insulation
Working steps:
Create even substrate
Cut SLENTITE® board to required size
Apply adhesive render
Install cut SLENTITE® board as required
Apply render top coat and desired finish
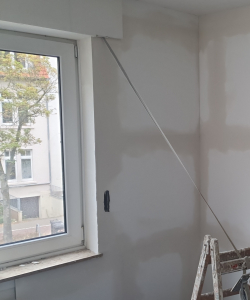
Application example: Interior insulation system
Working steps:
Create even substrate
Apply adhesive render
Install SLENTITE® boards as required, cut where needed
Apply render top coat and desired finish
Disclaimer
The data contained in this document as well as advice or other support services are based on our current knowledge and experience and are provided according to our best knowledge. In view of many factors that may affect processing and application of our products, this data does not relieve processors from carrying out their own investigations and tests, particularly with regards to the suitability of the goods supplied for the processes and purposes they intend to use them for; neither does this data imply any guarantee of certain properties, or the suitability of the product for a specific purpose. Any descriptions, drawings, photographs, data, proportions, weights, measured values etc. given herein may change without prior notice and do not constitute the agreed contractual quality of the product. It is the responsibility of the recipient of our products to ensure that any proprietary rights and existing laws and legislation are observed.


